Do you know how to Change Facebook Page Name? In this article, we will provide a step-by-step guide on how to change your Facebook Page name.
Facebook Pages are valuable tools for businesses, organizations, and individuals to connect with their audience and promote their brand. However, circumstances may arise when you need to change your Page name due to rebranding, business updates, or simply because the current name no longer aligns with your goals.
Important Considerations Before Change Your Facebook Page Name
Before diving into the process, there are a few important points to consider
- Eligibility: Not all Pages are eligible to change their name. Facebook has specific guidelines that your Page must meet to qualify for a name change. For instance, Pages with too many likes or recent name changes may not be eligible.
- Page Admin Role: Only Page Admins have the authority to change the Page name. Ensure you have the necessary permissions before proceeding.
- Page Category: Some Page categories may have more restrictions on name changes than others. Make sure you are aware of the limitations specific to your Page category.
The old Facebook Pages experience is being replaced by the new Pages experience. You may still use many of the same tools to build a brand or business, maintain your online reputation, grow your audience, and communicate with followers. All of your content, insights, adverts, Likes, and followers will be promptly transferred when your Page is upgraded.
How to Change Facebook Page Name: New Methods
If you have Facebook access to your Page, you can log in and ask Facebook to modify the name of your Page.
You cannot ask to have the name of a Page you have task access to changed.
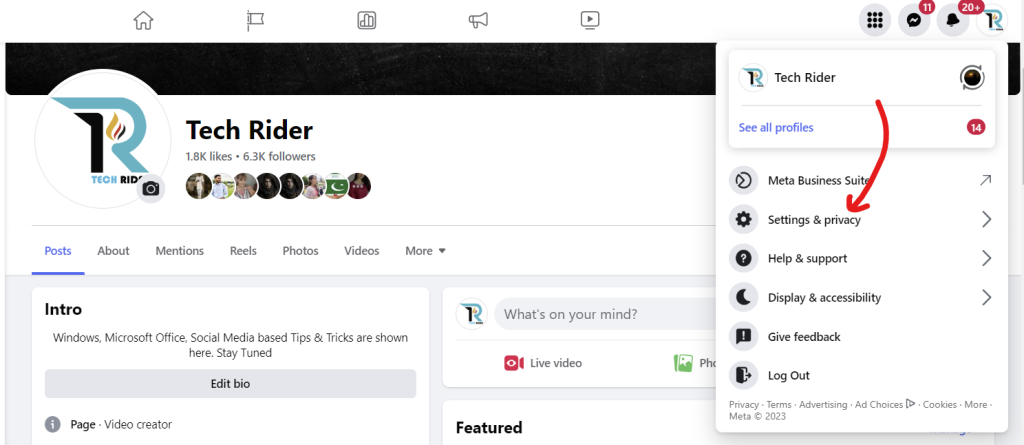
- Click your profile picture in the top right after logging into Facebook.
- Select the Page you wish to switch to after clicking See all Profiles.
- In the top right corner, click your Page photo.

- Choose Settings, then choose Settings & privacy.
- Next to the name of your Page, click Edit under General Page Settings.

- Change the name of your Page, then click “Review Change.”
- After entering your password, press Request Change.
If you are unable to change the name of your Page, there might be some reasons:
- You lack the Page access or role necessary to modify the name of your Page.
- Your Page’s name was recently modified by you or another person with access to Facebook.
- Limitations can apply to your Page.
- If a regional Page is a subpage of a global page, its name cannot be changed.
How to Change Facebook Page Name: Old Methods
Let’s see the old Facebook methods as how to change facebook page name.
Step 1: Open Facebook and Access Your Page
Log in to your Facebook account and navigate to your Facebook Page that you wish to rename.
Step 2: Click on “About”
On your Facebook Page, click on the “About” tab located on the left-hand side.
Step 3: Click “Edit” next to Your Page Name
In the “General” section, you will see your current Page name. Click on the “Edit” button next to it.
Step 4: Enter the New Page Name
A pop-up window will appear, allowing you to enter your new Page name. Type the new name you wish to use.
Step 5: Review Name Change Guidelines
Facebook will display some guidelines for changing your Page name. Ensure that your new name complies with these rules to avoid any issues.
Step 6: Click “Continue” and Enter Your Password
Click the “Continue” button. Facebook may ask you to enter your password for security purposes. Provide your password to proceed.
Step 7: Submit Your Name Change Request
After confirming your password, click the “Request Change” button. Facebook will now review your name change request.
Step 8: Await Facebook’s Review
Facebook will review your name change request, which may take anywhere from a few minutes to a few days. During this time, your Page name will remain unchanged.
Step 9: Check for Name Change Approval
Once Facebook reviews your request, you will receive a notification about the status of your name change. If your request is approved, your Page’s new name will be updated.
Step 10: Review and Update Your Page
After the name change is approved, take some time to review your Page and ensure that all information, branding, and content align with the new name.
For better understanding watch this video & learn How to Change Facebook Page Name
Read more: Must-Do Activities Before Bed: Cultivating a Healthy Nighttime Routine
Conclusions: How to Change Facebook Page Name
Changing your Facebook Page name can be a straightforward process if you meet the eligibility criteria and follow the guidelines provided by Facebook.
Remember that name changes are subject to approval, and it’s essential to choose a name that accurately reflects your brand or entity.
By following the step-by-step guide as How to Change Facebook Page Name in this article, you can successfully Change your Facebook Page name and continue engaging with your audience under your new identity.
